Tuesday 29 September 2015

Home is Where Our Story Begins


Hi Everyone 

I have a cheerful, bright and simple layout for you today, using some of the new release feathers you will find in the shop.

Home is Where Our Story Begins


I quickly snapped this photo on a late afternoon beach walk with my daughter.  It's not a special photo per se, but it evokes the memory of us just spending time together as mother and daughter, and thats a special memory to hold on to.


YCW's Ornate Frame 11 is equally at home on a vintage layout or a project with a more modern feel. To pair it with the vibrant fresh colours in the Life is Beautiful collection by Aussie company Cocoa Vanilla Studio I've pulled the turquoise from the colour palette of the collection with two coats of Tim Holtz Distress Paint in Tumbled Glass. To add a little depth I've sanded the edges once the paint dried.


Those beautiful feathers have been treated with a heat embossed gold and really bring out that gold foil look.


The title has been daubed with pink and coral acrylic paint and then heat embossed with a clear coat for some shine.


Your Creative Wings product used:  Feathers - Basic Mixed YCW 3049,  Ornate Frame 11 YCW 6011, Quote - Home is Where Small YCW 1072.

Other Product Used:  Cocoa Vanilla Studio Life is Beautiful patterned paper, Bazzill cardstock, Crate Paper gold foil vellum, Cocoa Vanilla Studio Life is Beautiful sticker sheet, TCW stencil, Faber Castell Whipped Spackle, Tim Holtz Distress Paint in Tumbled Glass, gold embossing powder, typewriter, enamel dot, gold thread, Prima Color Bloom spray in Peony, Heidi Swapp Color Shine in Coral, acrylic paint, clear embossing powder.

I'm sad to say this will be my last post for Your Creative Wings.  I've had the most amazing time on the team team but due to a change in circumstances I need to step down.

The girls have some stunning layouts coming up, and the awesome new chippy designs just keep on coming (umm... have you SEEN the pieces in the brand new Boho range???).

Thanks for dropping by today!


Friday 17 July 2015

Your Creative Wings July Inspiration

Hi Everyone

Thanks for joining me with some Your Creative Wings inspiration today!

The Smallest Things


The lovely Secret Garden collection from Kaisercraft and this photo of Kayci taken a few years ago at Taupo in New Zealand were the starting points for this layout.  


I loved the shabby chic and feminine vibe to the papers, and so I knew I wanted to use a white and pale blue treatment to my chippy pieces to carry that shabby chic style through the layout. 


You can see the sweet little antique key here, and for the blue treatment on it (and the lock and clock face arms which you can see in the photo below), I've just applied a quick coat of Tim Holtz Distress Paint in Tumbled Glass.  Because I was aiming for an antique look I only needed one coat to the raw chippy so that you can see some of the raw chipboard slightly showing through.  After the  paint dried I used some sandpaper to sand the edges of the chippy.


For the white treatment to the ornate clock and ornate post I base coated with gesso and then heat embossed with white embossing powder.  I really like the smoother finish that you can achieve with a  coat of gesso before embossing in white.. OCD much?!

How sweet is the little antique lock in the top left!?


The ornate post was blended into the flower cluster by first wrapping a leafy vine ribbon around it and then some hemp twine.  Then just adding a few flowers here and there really blends it in.


Your Creative Wings product used:  Keys & Locks Small YCW8013, Ornate Post YCW 19005, Wrought Iron Clock YCW 16017.

Other product used:  Kaisercraft patterned paper, Secret Garden collection,  Bazzill cardstock, French Lattice Small Frame, English Tea Party Doily & French Pastry Tiny Doily dies from Cheery Lin Designs, Martha Stewart punch around the page punch, My Minds Eye enamel dots, corrugated cardboard, doily, gesso, whit embossing powder, Tim Holtz Distress Paint in Tumbled Glass, topstitch thread, hemp twine, peg - mini, vine ribbon, various flowers, Tim Holtz Distress Ink in Antique Linen and Tattered Rose, Darkroom Door texture stamp, Prima Color Bloom mist in Peony.


Love


Oh my, young love.. There's something so special and heartwarming about it yes?  We were really excited to meet Sophie for the first time last weekend and thankfully she's a little more willing to have photos taken than Brent normally is.  


I've been hoarding this amazing Gramercy Road collection by Gossamer Blue for way too long, and it was so perfect for these photos!


Often chippy pieces are used on traditional scrapbook layouts with a myriad of treatments, but if you're wanting to use some pieces on a clean and simple design, try leaving them as raw chippy without any altering - they look great!  I've used the raw camera piece on this layout and then added a little acrylic paint to the separate tiny heart (that comes in the pack) and inked a little shadow in a slightly darker shade of pink.  Simply adhere the coloured heart to the top of the chippy piece.


I so love my chippy alphas, to be able to alter them any way you please is so much better than spending an obscene amount of money on a huge stash of Thickers.  I've used this one alpha set on at least four layouts and I still have plenty left.  


To treat the Polaroid Frame Set - Love, I've dabbed some Tim Holtz Distress Stain in Black Soot on the scripted love word, and then trimmed some patterned paper to the same size as the polaroid frame and adhered it to the chipboard.  

Your Creative Wings product used:  Alpha # 1 YCW5006, Cameras YCW8002, Geo Pointers - Stars & Arrows YCW4006, Hearts n Arrows YCW4019, Polaroid Frame Set - Love YCW6025

Other product used:  Gossamer Blue patterned paper, American Crafts cardstock, EK Success edge punch, Gossamer Blue ephemera pack, hemp twine, Tim Holtz Tiny Attacher, Tim Holtz Distress Stain in Black Soot, gesso, acrylic paint, Versa Color ink in Old Rose, Stazon Ink.

Thanks so much for dropping by today!


Friday 19 June 2015

Mixed Media Inspiration with Your Creative Wings

Hi everyone and today I'm sharing some Your Creative Wings mixed media inspiration.

This gorgeous, doodley, almost gothic styled patterned paper from Prima Marketing Inc provided me with the inspiration this month to create a gothic yet feminine layout.  I've also featured three of the frames from Your Creative Wings Frames Collection in this one layout.

Moments


This layout has lots of layers and different mediums to it, and even some textural elements like micro and glass beads.


To create the base layers I adhered strips of patterned paper in a random pattern and added some torn up pieces of old sewing pattern tissue paper.  After dry brushing with gesso I added texture paste tinted with shavings from a pale pink Gelato through a stencil.

After working out the position of the outer frame I adhered some micro beads and then applied mists around the frame.


To treat the gorgeous Wreath - Leafy Set, I first spritzed the entire frame with water and let it sit for a couple of minutes to loosen the layers of chippy.  Then I took my scalpel (carefully so there are no scrapping injuries lol!), and scuffed up the top layer.  This doesn't have to be perfect, after all it's a random effect we're looking for.  Then apply a coat of gesso over the frame, so that you can still see some raw areas of chippy.  Give a quick dry with a heat tool and then add mists to sections of the frame.  Dry with a heat tool as you go, and add more colour as you like.

The Wreath - Willow frame has simply been given a coat of Distress Paint in Black Soot.


My title, Moments, has again been coated in Black Soot Distress Paint and then a coat of Glossy Accents.  Remember that these titles are quite flexible, so you can bend them out of their usual shape to suit your project.


I've tucked one of the little dress forms from the Mannequin Set into my flower cluster, with patterned paper adhered and some liquid pearls for added details, and of course some satin seam binding to accentuate the feminine side to a gothic layout!


I love digging into my stash of little bits and bobs that add detail to a layout.  The Butterflies - Mini set is perfect to have on hand to add details in and around a flower cluster.  I've used some Tinby Metallic Melts here for their lovely metallic sheen.

Your Creative Wings product used:  Ornate Frame 16 Tiny YCW6017, Words - Captured Moments Script YCW1057, Wreath - Leafy Set YCW2021, Wreath - Willow 11cm YCW2022, Mannequin Set YCW16017, Butterflies - Mini YCW3042

Other product used:  Prima Marketing Inc patterned paper, Bazzill cardstock, Martha Stewart edge punch, gesso, clear gesso, texture paste, Tim Holtz Distress Ink in Black Soot and Antique Linen, Faber Castell Gelato in Guava, Tim Holtz Stampers Anonymous stencil, fabric pattern paper, Micro Beads in Florentine Gold, Prima Marketing Inc mist in Peony, Distress Paint in Black Soot, Liquid Pearls in Platinum Pearl, Stazon Ink, Kaisercraft stamp, glass beads, Prima Marketing Inc flowers, Petaloo flowers, satin seam binding, Tinby Metallic Melts, doily.


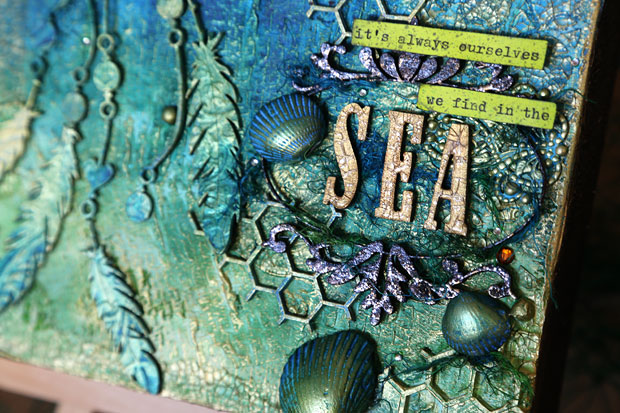
Canvas - Its Always Ourselves We Find in the Sea


I visited the Brisbane Scrapbook and Papercraft Expo in Brisbane a couple of weekends ago and had the opportunity to take a class by the lovely and very talented Sue Smythe.  This canvas gives a nod to the techniques and artistic style that she taught in the class, but with my theming and design.


How amazing is the Dreamcatcher chippy piece!?  I love the hearts and feathers and intricate criss-cross of threads in the main piece.  The Dreamcatcher and mesh panel pieces have been given a coat of Gesso and sprayed with Dylusions mists, and then finally dry brushed with gold acrylic paint.

The quote comes from one of my all-time favourite poems, Maggie and Milly and Molly and May by E.E. Cummings.


I've painted the heart in the dreamcatcher with gold paint and given a generous coat of Distress Crackle Paint in Rock Candy.  When that dried I spritzed with a black mist to accent the crackle.  I've also collected a few shells from our beach here and treated them with gesso, mists and gold paint as well.


The frame has been heat embossed with a mixed embossing enamel by Stampendous, and the alphas treated the same as the heart in the centre of the Dreamcatcher.

And as always, a bit of bling to finish this little canvas off!


Your Creative Wings product used:  Dreamcatcher YCW8012, Ornate Frame 11 YCW6011, Mesh Panel YCW8010, Alpha # 1 YCW5006

Other product used:  Canvas, white & black gesso, Cuttlebug embossing folder, Tim Holtz Distress Crackle Paint in Rock Candy, Dylusions ink in Fresh Lime, Cut Grass, London Blue & Calypso Teal. Tattered Angels Glimmer Mist in Black Magic, gel medium, Stampendous Embossing Enamel in Aged Marine, acrylic paint, gauze, Wendy Vecchi Crackled Texture Paste, The Crafters Workshop stencil, metal ephemera, shells, hemp twine, typewriter, Stazon ink, diamontes, paper towel

Thanks so much for dropping by today.  Have you visited the shop lately?  I spy some special new goodies here and here that are hot off the YCW press!!


Wednesday 27 May 2015

Your Creative Wings - Girly Layout Inspiration

I have to say there are the most beautiful new chippy pieces being released by Your Creative Wings at the moment, I may have gushed... a lot.... over my latest happy mail package!! 

So Sweet


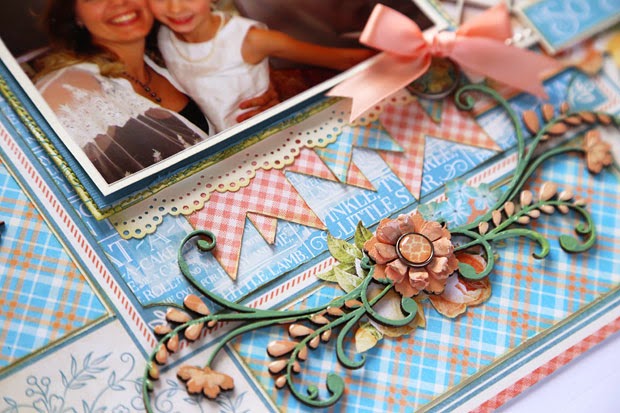
I've used three of the latest releases on this layout: the Flutterby Charm 2 Mini, the Doily Bunting, and the gorgeous layered Floral Flourish.


The Mini Flutterby Charm 2 is the sweetest little mini charm.  I've used acrylic paint in a complimentary peachy shade to the patterned papers, shading to a very pale peach in the centre of the charm.   I treated the layered butterfly the same way, with the darker shade in the centre, and the lighter shade towards the edges of his wings.

Some Liquid Pearls add some extra highlights to the piece.


Now who doesn't love bunting... and lace doily bunting at that!? Each individual doily has a removable centre, and I've covered the centres in a patterned paper from the collection and shaded the edges.  I've dabbed cream acrylic paint on the lace or outer pieces using a sponge, this allows the detail in the chippy to show through.


The French Window 2 provides a perfect foreground to one of the mother and baby images from the Precious Memories collection. Its like peaking straight through the window of a house and I love how it reinforces the mother & daughter sentiment of the layout.  Again this piece has been sponged with acrylic paint and finished with some Perfect Pearls.


The layered floral flourish has an extra flower in the pack to layer.  To add extra dimension I've spritzed the flower with some water, let it sit for a couple of minutes and then separated and squished up the top layer of chipboard.  I've painted with acrylic paint, adding a little shading to the flowers and buds, and then added Glossy Accents over each bud. 

Your Creative Wings product used:  Floral Flourish YCW7019; Doily Bunting YCW9014; Flutterby Charm 2 Mini YCW304; French Window 2 YCW18003.

Other Product used: Graphic 45 Precious Memories patterned paper; Bazzill cardstock; Martha Stewart edge punch; acrylic paint; gesso; Glossy Accents; satin ribbon, Liquid Pearls in Platinum Pearl; Tim Holtz Distress Ink in Antique Linen; Versa Color ink in Bamboo; My Minds Eye brads; topstitch thread


Unconditional Love


Anyone who has seen a couple of my layouts knows that if I have any opportunity whatsoever to add some gold (or silver) then it's going to end up on the page ha!  This layout has gold glitter, gold foil, gold stitching... and some gold heat embossing just for good measure.


I've left the title chippy piece raw because I love how it ties in with the burlap background, and the background of the photo.


To create the gold tipped arrows, paint the rear end of the arrows with acrylic paint, and heat emboss the arrow head with gold embossing powder.


The new Circles Charm set has layers of circles that can be left together, or removed and treated separately depending on how you want to use them.  I've separated each piece and chosen different shades of acrylic paint and gold embossing powder to create colourful circles.

A few extra little hearts are the perfect finishing touch to embellish the charms.


Your Creative Wings product used: Unconditional Love Title YCW1064; Love Candy YCW12018; Hearts & Arrows YCW 4019; Circles Charm Set YCW 16021

Other product used: Crate Paper Craft Market Burlap; Crate Paper patterned paper, American Crafts gold vellum; Crate Paper Craft Market Accent Stickers; Bazzill cardstock; American Crafts Pow Glitter Paper; gold thread; topstitch thread; acrylic paint; gesso; gold embossing powder; white embossing powder.


Thanks so much for dropping by today.  Be sure to drop by the Your Creative Wings shop regularly as beautiful new pieces are being released all the time.


Wednesday 20 May 2015

Coffee Date

I'm generally a slow scrapper, and don't mind spending time (probably too much time), shuffling paper in creating a layout.  But this layout was really only using up some leftovers from this project life spread, and came together quite quickly.     Because it was such a quick spread it took me by surprise when it was accepted  for publishing in the recent March issue of Scrapbooking Memories magazine.


I love these stitched shape stamps from Prima.  I missed out on the popular circular set, but did manage to pick up this square set.  They're great to create a background with.


My title was made with Jillibean Soup alphas, and I've accentuated them a little with an outline in black pen.  


I seriously have way too many Project Life cards in my stash, and I grabbed one of them to record my journalling on.  I created a 3x4" text box in a Word document on my computer, typed my journalling, printed it on an A4 sheet of paper, held it up to the light to line up the printing, and adhered my journalling card to the paper.  Printed it out again and the journalling lined up perfectly!

It actually felt a bit weird having our 'drinks of choice' readable in a magazine, but that's one of the things I love about scrapbooking, recording the mundane, everyday things that are otherwise forgotten.


As someone who usually adds stitching on every layout, these Prima stamps provide a quick alternative to machine stitching.  Just ink the section of the stamp you want to use, and stamp on overlapping edges of paper. 

Thanks so much for stopping by today!


Saturday 18 April 2015

Your Creative Wings - Vintage Inspiration

I've been feeling in a bit of a vintage vibe lately, and after seeing the new Antique Bazaar collection from Kaisercraft I knew it would be perfect to highlight one of my family heritage photos.

I tried to work out what year this photo was taken, but at the end of the day it's an educated guess, so I didn't want to claim it to be a particular year, hence the title Circa 1917.  What I do know about the photo is who the people in it are, and that it was taken in a studio in Gympie, also my own hometown.  The girl on the top left is my Great Grandma Enid. Her Dad Thomas (on the right) was a carpenter at the time, and it would have only been a couple of years after this photo was taken that he helped Enid to carve and assemble the most beautiful timber serving tray that I still have today, nearly 100 years later.


The new Polaroid Frame set has been cleverly put together so that you get lots and lots of polaroid frames from the one chippy piece (and that's great value for money!).  I really liked how they all interlocked together and decided to use that theme to create a background. 


To achieve the vintage brassy finish to these pieces I first dabbed some gold paint randomly on them. Then spritzed with two shades of mist (I used Tattered Angels Glimmer Mist in Mustard Seed & Coffee Shop).  I then ran them through my Cuttlebug using a large damask embossing folder.  I applied some charcoal Kindyglitz along the impressions made by the embossing folder, before giving a good coat of Tim Holtz Distress Crackle Paint in Rock Candy.  When this dried it was a bit too gold and not quite brassy enough for my liking, so I added a coat of Tim Holtz Distress Stain in Tarnished Brass, and removed the excess with a baby wipe.


The Alpha #2 set is great for when you need some smaller alphas, and includes both letters and numbers.  These have been treated with Distress Paint in Black Soot, and then a coat of Glossy Accents for that beautiful glossy finish.


The flourish from the Sprig Flourish Set has been painted with Gesso and then with Crackle Paint.  Once dry I've inked with some Frayed Burlap Distress Ink and again removed the excess with a baby wipe.  This really accentuates the crackle lines.  Finally I've painted with Mod Podge and sprinkled with Twinklets Diamond Dust.


I just love how the Diamond Dust, Crackle Paint and the Glossy Accents on the alphas sparkle and throw the light!


Your Creative Wings Product Used:  Polaroid Frame Set YCW6023, Sprig Flourish Set YCW7013, Alpha #2 YCW5001U

Other Product Used:  Bazzill cardstock, Kaisercraft Antique Bazaar Collection patterned paper, Die-namics & Spellbinders dies; Tim Holtz film strip ribbon, metal findings, Prima Junkyard Findings, My Minds Eye brad, Petaloo, Kaisercraft & Green Tara flowers, Carl punch, The Crafters Workshop stencil, Kaisercraft & Prima stamps, Versa Color, Versamark & Tim Holtz Distress Inks, thread, clear gesso, gesso, Tim Holtz Distress Paint in Black Soot, Glossy Accents, gold acrylic paint, Tattered Angels Glimmer Mist in Mustard Seed & Coffee Shop, Cuttlebug embossing folder, Tim Holtz Distress Crackle Paint in Rock Candy.  Tim Holtz Distress Stain in Tarnished Brass, Kindyglitz, Mod Podge, Twinklets Diamond Dust, Tinby Designs Metallic Melts in Patina.


My second layout today is more feminine, and uses another of Kaisercraft's latest collections, Oh So Lovely.


So far there are 14 different frames to choose from in the Your Creative Wings frame collection.  I do love the Ornate Frame 2, because it's square based it's perfect for Instagram photos, and another smaller square frame can be layered inside it, like this one from Crate Paper.

I played around a bit with finishes for two of the chippy pieces on this layout, and initially painted them with acrylic paint but then misted over that with Tattered Angels Glimmer Mist in Coffee Shop. Because of the acrylic paint layer the finish of the mist is a little different than if i had misted raw chipboard, but I love the finished effect!


The Chain Set comes with two sizes of chain, and they work really easily together.  Perfect for hanging my fussy cut bird cages from!


The shop now has a huge collection of Words & Quotes.  It's too hard to pick a favourite, but I love all the scripty words.  My title has just been primed with gesso and then painted with acrylic paint.


The Flutterby Charm 2 comes with additional butterflies for layering.  This piece has been treated the same as the frame, and I've layered an extra butterfly that has been painted in Tim Holtz Distress Paint in Antique Linen.


Your Creative Wings Product Used:  Ornate Frame 2 YCW6004, Flutterby Charm 2 YCW3044, Ball Chain Lengths YCW11009, Words - So Happy YCW1056.

Other Product Used:  Kaisercraft, Bo Bunny, Basic Grey & My Minds Eye patterned paper, Cheery Lin Designs die, doily, Prima Say It In Crystals, sequins, Prima stamp, Ranger Archival Ink, Tim Holtz Distress Ink, Prima & Kaisercraft flowers, Tattered Angels Glimmer Mist, Tim Holtz Distress Paint, acrylic paint, The Crafters Workshop stencil, Crate Paper frame.

Thanks so much for dropping by today!