Friday, 10 May 2019

Sweet Mother's Day Mini Album | Hip Kit Club

Hi friends, all this week the Hip Kit Club design team are sharing beautiful Mother's Day projects in honour of those that mean so much to us, our Mums!

My kids are in their early 20's and the first few years of their really adult lives have brought me so much joy and admiration for the people they've grown into. So I decided to make a mini album using photos of just them and me (since the theme is Mother's Day), and add some meaningful quotes from Pinterest, and also use some of the Paige Evans 2x2in phrase tags from the April Pocket Life kit throughout.


Just a quick note before we go any further that the ribbons, lace, embroidery thread and sequins in this project are from my own personal stash. Everything else is from the beautiful April 2019 Hip Kits, and yes that does include those exquisite charms from the Maggie Holmes Sunny Days collection!


Since my photos were all taken at different times and in different situations, to create cohesiveness throughout the album I printed them all in black and white. I also printed them all at 1.5in wide on their shortest side, and layered vellum behind nearly all of them. Because my mini is well, mini, this creates a soft layer without being overbearing on such a small scaled project.

There's a lot of photos from here on in, so I won't talk too much further, but if you have any questions please leave them in the comments and I'll come back to you!


One of my challenges for this project is to use the negatives of cut files. These sweet clouds are part of the April Freebie cut file, and I separated them out from the rest of the cut file and moved them close to each other. So that I could make a shaker pocket out of them I duplicated the clouds then flipped the second set horizontally. Then I spaced them far enough apart so I would have enough room to die cut the heart pages. 

Once the clouds were cut on my Silhouette I placed my two pieces of card together, aligning the clouds (this is the tricky part which is why we flipped one set horizontally!) A little piece of washi helped to hold them in place while I ran them through my Big Shot. Then I pieced them back together in the usual shaker pocket-making method. I think they turned out pretty cute in the pink cardstock!


This is another negative of a cut file and it looks just as pretty as its positive! I trimmed the cardstock I cut it from into a strip and placed the very middle of the letters back inside. It didn't quite fit into the heart but that's okay, I just trimmed a little extra corner piece around the 'H'. That's what's so great about mini albums, the little bits and pieces sticking out from the edges!


To make this interactive element I folded some patterned paper in half horizontally and ran it through my die cut machine so that it didn't quite cut the entire heart out on the left side. This is important to make the flap to hold it together. 

There are some papers from Shimelle's Sparkle City collection in this kit, and Shimelle does the most ahmazing branding strips!! The pink and purple polka dot in the photo above and the tiny bunches of flowers in the photo below are both branding strips from Shimelle's papers.

I tucked in the photo for this page with a few extra pieces and held everything in place with a paperclip.


I created a little pocket for this page to place a few bits and pieces into. I cut strips from one of the 2x2in Paige Evans swatches and folded them in half to make tabs to pull out each of my two photos.

I also trimmed down two cards from the Pocket Life kit as fun elements. I stitched some pretty lace onto the end of one, and will add some journalling onto the 'afternoon' tag (both of these photos were taken in the afternoon of their given day).


I thought this was such a great quote to finish off my album. It's so true that raising children is a busy, crazy, frustrating, rewarding, fun, challenging time. But by the time they get to be adults you'll look back and wonder where the time went.

Thanks so much for stopping by, and I hope if you're a Mum you have a wonderful Mother's Day this Sunday, and I also hope you have someone in your life who is a Mum that you can make feel special too!


Wednesday, 8 May 2019

Happy (inter) National Scrapbooking Day!! | Hip Kit Club


Hi guys, and happy (inter) National Scrapbooking Day!  I hope you've had a chance to get your crafty on today, or at least this weekend (because let's face it, scrapbooking deserves a weekend of celebration right!?)

Hip Kit Club are having an amazing weekend of challenges, fun games, a YouTube hop and so.many.prizes. on their Facebook member page!  Here's a link to where you can find out about all the fun, and I promise, there is a Bunch of fun happening over there.  Pst you don't even have to be a subscriber to join in the fun.. everyone's welcome!!

Each of the design team are posting challenges across the weekend that you can join in and contribute an entry to for a chance to win some awesome prizes.  My challenge is to make something that's just for you, something pretty that you can enjoy.  It can be some wall art or something to sit on a shelf, it can be some bunting made from patterned papers, it could also be something like a bookmark! There are so many options here, but the two challenges you have to meet are that:

  • It's for you so that you can enjoy it (not for anyone else); and
  • It can't  be any type of spread (no photos allowed guys!)

And here's my challenge piece, an altered mini clipboard with some pretty 3D flowers and my initial embroidered in one of my very favourite colours.  


I had some Maggie Holmes Apple Blossom paper left in my March Hip Kits and it was just perfect for my background.  I trimmed it to nearly size and adhered it with some Mod Podge.  When it was dry I used a large foam nail file to basically file off the paper right to the edge of the clipboard.  To do this use the file at a 45 degree angle to the board, and drag from above clipboard to below the clipboard.  


Then I used some Distress Ink in Antique Linen to distress the edges just a little.  It's been a while since I've used this technique but it works so well with Maggie Holmes collections.

To create that brilliant gold layer I used the gold washi tape from the March Embellishment Kit and adhered it to some white cardstock to give it some body.  Then I measured it to the size I needed and cut a 45 degree angle on each of the corners to make it look like a frame element.


The blue scalloped layer was made with an edge punch from my stash using the Typhoon cardstock from the Cardstock Kit.  I trimmed a few strips out and adhered them under my main white cardstock layer.

To create the letter I typed out my initial in Silhouette Studio in Times New Roman font at 586 size.  I love the classic look of this font for this type of project!

Now this bit is a bit fiddly, I pierced holes around the edge of the letter and chain stitched with embroidery thread right around it.  You do need a little patience for this haha but it's totally worth it!


And finally I get to play with the gorgeous 3D flower cut file!  I pulled all my leftover patterned papers and cardstock from the March kits and cut these flowers out on my Silhouette machine, before winding them up and hot glueing them together to make these gorgeous blooms.


I also added a few leaflets punched from the same blue cardstock with a punch from my stash, and added one of the beautiful Maggie Holmes bows from the embellishment kit and some ribbons from my stash and a couple of charms from the April embellishment kit.

Thanks for stopping by today guys, and I hope you take up the challenge to make something pretty just for you!


Wednesday, 1 May 2019

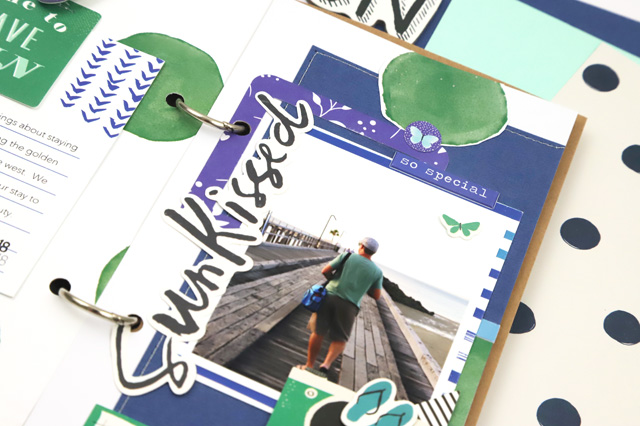
Sunkissed TN Spread | Hip Kit Club

Hi friends!  Today I have a traveller's notebook spread for Hip Kit Club using the March 2019 kits.


One of the many things I love about Hip Kit Club is the constant sources of inspiration and ideas to kickstart your scrapping. Today I'm using just one of those inspiration pieces to base my project on, and that's the April 2019 Moodboard.


This is my spread, and while it has a different colour palette from the mood board (that you can see below), I've pulled a bunch of inspiration from it.  I've used:

  • The circle shapes and green colour from the top left image - in the background
  • The horizontal stripe from the middle left image - in a layer behind my photo
  • The sunshine sentiment from the bottom left image - in the title
  • The butterflies from the bottom right image
  • Black and white highlights from the top right image
In fact the only image I haven't used is the pink background and flowers, and since this is a spread about my hubby... well I can probably get away with that ha!


I trimmed some Heidi Swapp Tickled Pink paper from the Paper Add On Kit as the base of my left page, and white cardstock for my right, but I also fussy cut some extra circles to layer over the Typhoon cardstock on the right side.


I pulled that blue horizontal striped 3x4 card from the Pocket Life kit to layer behind my photo, and added some coordinating stickers, puffy stickers and ephemera pieces around it.  My title was too long to use horizontally on one page, so I adhered it vertically.


The left side of my spread came together so quickly using a journalling card from the Pocket Life kit as my focus and to print journalling on. Then I pulled some coordinating pieces to place around the page.


Since this spread is about our late afternoons on our holiday to Fraser Island I really wanted to use this 'PM' sentiment that was on one of the project life filler cards this month.  I trimmed the card down little, and then used a circle punch to punch it out like a tab.  Love how this turned out!

And that's the finished spread.  What's your favourite type of inspiration that gets you kickstarted on a project?  Is it sketch based, colour palette based or something else?  I'd love to hear!


Thanks for stopping by today xo


Sunday, 28 April 2019

Week 7 2019 & 3 Tips to Tweak Your Pocket Life Kits | Hip Kit Club

Hi friends!  Do you ever work with a project life kit and wonder how you can add you own personal touches to your pocket page spreads? I'm working with the beautiful March 2019 Pocket Life Kit from Hip Kit Club today, and I'm sharing a few ideas how to add your own individual touches to your pocket page spreads without needing to reach for additional items.

Here's my Week 7 for 2019, and I'm using just the March 2019 Pocket Life kit with nothing extra.  (Okay... you got me... I did use a bit of white cardstock and some thread from my stash.. but that's it I promise!)


My first tip is to remember that you can use the project life cards in a different way than they come to you.  For my title card this week I used some border punches and chose four coordinating cards and some white cardstock to punch a series of strips.  

Then I pieced them together like patchwork.  Finally I stitched along some of the punched strips in a silver metallic thread.  This creates a lot of visual texture without being too bulky, and we all know that's important when it comes to fitting cards into those pocket pages!


My second tip is to keep an eye out for elements that are easy to turn into a focal point for your weekly title.  The quickest and easiest thing to look for is a label, but today this beautiful wreath puffy sticker really caught my eye.  It provides the perfect place to record the week and date details, and some definition to separate it from the rest of the card.


My third tip is to make use of the ephemera pieces, especially the larger ones, to create your own simple filler cards.  

I layered this super cute rainbow over a banner made from white cardstock with a stitched border, and all I needed to add to finish it off was a heart puffy sticker.  

Remember even on project life spreads it's good to give your eye somewhere to rest without having the entire spread being really busy.

Thanks for joining me today and I hope I've given you some inspiration to personalise your Project Life spreads.  

I have a process video for this layout up on my YouTube channel today, it's my first process video so I'm scared and excited and all those emotions right now!  You can check it out here.


If you've been creating PL spreads with your Hip Kits be sure to share them over in the Hip Kit Member Forum on Facebook, I'd love to see some of your Project Life spreads over there!


Tuesday, 23 April 2019

Bloom! | Traveller's Notebook layout for Hip Kit Club

Hi guys!  In Australia right now we're celebrating the cooling days of Autumn (Fall) while our friends in the northern hemisphere are celebrating the warming days of Spring.  I don't know about you, but I love these in-between seasons the most.

I'm sharing a traveller's notebook spread for Hip Kit Club today documenting a fun weekend road trip we took a couple years back to a city that's famous for its Spring garden festival.  The colours of the blooms and trees were just incredible!


I'm using the gorgeous March 2019 Pocket Life kit, Paper kit, Embellishment kit, Cardstock kit and the February 2019 Colour kit from Hip Kit Club in this spread.  I've also added in some lace and a paperclip from my stash.


The left page started with a background of pink polka dot paper layered with a  coordinating paper from the Sunny Days collection by Maggie Holmes.  I stitched the edge with a little zig zag stitch on my sewing machine for some texture and definition.

Then I layered some ephemera pieces anda  fussy cut card from the Pocket Life kit, and that gorgeous hummingbird (or is it a honeyeater?) from the exclusive puffy sticker sheet.


These Heidi Swapp alphas from the Embellishment kit are so colourful and perfect for a Spring layout!   I chose a simple title and added some of the super cute watercolour flower puffy stickers from the Pocket Life kit straight over the top of a couple of the alphas.


I love to have a contrast between the two sides in my TN, so on this spread where my left side is layered and full of colour, my right side is more clean and simple.


I used the pink and turquoise Opal Magic acrylic paints by Prima from the February Colour kit to splatter around the centre of my right page, which is a base of white cardstock.  I also mixed and splattered a couple of extra colours from my watercolour set to work with the colours on my layout.

I added journalling to one of the Heidi Swapp cards from the Pocket Life kit and cut a strip of paper to tie as a bow on my paperclip.


With that I called this one done!  Do you make layouts about the seasons at all?  I'd love to hear what your favourite season is and how you document it.


Tuesday, 16 April 2019

Sketch Challenge on a Travellers Notebook | Hip Kit Club

Hi friends!  Sharing my latest Travellers Notebook spread for Hip Kit Club today, and it's based on one of the fun HKC fun weekly sketches.  The sketch is for a 12x12 layout, but you know I'm a huge fan of adapting full size layouts to fit into a TN, right?!

I've used the beautiful March 2019 Pocket Life, Embellishment, Paper and Cardstock kits from Hip Kit Club in this spread.

Here's my take on the sketch, and I've also put the sketch prompt by the lovely Maija below it.


My additional challenges for this project were to include stitching, and also pockets. Stitching was totally going to happen because I stitch on everything ha!  But given the design of the sketch and that it was downsized to a TN size, I had to think for a minute about how to incorporate the pocket.  The first thing I though of was a flip pocket, and that's what I went with!

Here you can see my two left banners... spot that tiny little pink tab at the bottom of the yellow banner?


Voila!  A teeny, tiny flip pocket with some layered embellishments and a fun sentiment.  I used some of the beautiful Doodlebug Designs gold washi tape from the embellishment kit to adhere the top and bottom parts of the pocket together.  You can see in this photo just how lovely and shimmery the gold of the washi is.  


I decided to go with a tone on tone effect for each of the banners, and used the amazing Prima Art Alchemy Opal Magic acrylic paints that came in the February Colour kit for the pink, green and yellow banners.  I mixed a blue shade from my watercolour set to match with the blue banner.  Then I splattered behind where each of the banners would sit.


I fussy cut some butterflies from one of the Maggie Holmes Sunny Days collection papers and layered them together, to represent the large splatters on the sketch.

My title was cut from one of the cards in the Pocket Life kit and follows the placement of the title in the sketch.


All that was left to do then was to play with some tone on tone embellishing.  I had so much fun layering together different elements from the kits here.  There are pieces from the Crate Paper chipboard sticker sheet, Crate Paper stickers, exclusive Hip Kit puffy stickers and the Hip Kit sticker sheet, and they all work just perfectly together.

Be sure to stop by the Hip Kit Club Facebook member group to play along with their weekly sketches, they're a bunch of fun and there's  $10 voucher for the HKC shop up for grabs each week.

I'd love to hear if you enjoy playing along with sketches or not, I definitely have a newfound love for them since I've joined the HKC team.

 Thanks for stopping by today xo


Saturday, 13 April 2019

Project Life - Week 4 2019 with Hip Kit Club

Hi guys and happy weekend!

Best laid plans sometimes go astray and sharing this project has been a few weeks coming.

I'm loving my 6x12 album for project life this year. I feel like the overall look of my layouts has changed a little compared to the 6x8 albums I've been using up until now, but I'm embracing the change and I quite like this new style!

This is my week 4 for 2019 using the January kits from Hip Kit Club that feature a lot of Pinkfresh Studio's Everyday Musings collection.


I loved the Happy 2019 filler card and used it as my title card.  I used the Heidi Swapp stamp set included in the kit to stamp my week to fit around the flowers and tea cup, and a couple of teeny tiny hearts to separate them.

I still love the Collect App to create polaroid style photos for my spreads.  You journal in the app and it prints the date plus your journalling straight onto a 3x4 photo.  Genius!

The notes from today journalling card had extra room for a subtitle on the left and I added one of the stickers from the sticker sheet in there and stitched over the top of it.


On the right of my spread I journaled about our daughter Kayci and the amazing work she does in her community, which resulted in a nomination for an Australia Day Award this year.  Since the photo of the Award Ceremony didn't really match the rest of my spread, I created a flip pocket to sit over the top of it, which is where my journaling sits.  I added a tab on the right to encourage people to recognise it as an interactive element.

The whitespace that is the sky in my 6x4 photo was perfect to add some alphas right onto the photo itself.  I used a cereal bowl placed on my photo to make sure each of the letters lined up in a circular kind of line if that makes sense.  Whatever works right!?  

Thanks for stopping by today guys!  I'll try to share another of my latest project life spreads this week.