Thursday, 4 July 2013

Getting Inky with Mixed Media Cards

I had some spare time for a small project recently and grabbed my gesso and some mists and stamps to play with a couple of mixed media cards.


I keep an old novel at my scrap desk and tear pages from it now and again to use as my background paper, and that's where I started with this card.


You can pick out some of the layers here, the book page, textured gesso, stamping with various stamps,  inks and then adding some embellishments, chipboard and rub ons.


The second card was for my nephew who had his 15th birthday coming up.   Being a teenage boy's card, I wanted to create something a little grungy, but without being too dark.  It's still a birthday card after all right?  


I was too impatient to wait for gesso to dry on this project so I simply started with a plain grid patterned paper and went from there.  A few mists, some doodling, and stamping helped to bring the paper to life.


This closeup really picks up the shine from the Tattered Angels Glimmer Mist (Black Magic).  So pretty.


The chipboard is "Chicken Mesh Wire" by Twiddleybitz.  I randomly snipped two pieces out and embossed with silver embossing powder to keep the metallic look, and then adhered it by stapling it with my Tim Holtz tiny attacher.

Even though I'm mostly a 'clean' project kind of girl, it's so much fun to get inky when I can!


Tuesday, 25 June 2013

It's all about the Cards...

Hi there friends!

Today at Paper Hearts it's all about the cards.  Now who doesn't love getting a hand made card?  I for one just Love getting hand made cards.  And giving them of course!  I love being able to create a card especially for a loved one, to be able to have them in my thoughts as I create, and to think that something I have made might brighten their day.  It seems just that little bit more special.

I've chosen a few of my favourite cards from the last little while to share with you today.


The stamp I have used on the first two cards is from the Gorjuss range.  This range has become available in Australia this year, however this particular stamp came from the UK range (thanks to a present from my lovely sister).


Both cards use Crate Paper's 6x6 Paper Pad from the Pretty Party collection.


This card is a wedding card made for my Uncle.  When we received our invitation to the wedding, it showcased the colour theme for the big day, which was purple and green.  This made it fairly simple to pick some patterned papers and flowers to keep my card in keeping with the theme that the couple had picked out to remember their special day by.

The papers here are from Kaisercraft (the script) and Basic Grey (the plum purple) .  I have also used a crochet doily from Kaisercraft and a chipboard frame from Imaginarium Designs.  The card is then finished with a mix of flowers and buds, and a sentiment printed from my computer in a pretty script font.  


And finally two cards using the "Sisters" Mini Theme from Echo Park Paper Co.  I've really enjoyed playing with shaker cards lately.  This card combines the shaker card technique, along with a patchwork background.  Some pearl sequins serve as my little "shakers".


Loving this collection.  The Sisters Mini Theme includes a sheet of adorable sticker accents full of girly images of bikes and birdies, flowers and banners, making the perfect layout or card for girlfriends (or Sisters of course)!

Have a great week!


Saturday, 15 June 2013

A weekend at the Brisbane Scrapbook Expo

Did anyone else have an amazing weekend at the Brisbane Scrapbook Expo last weekend?  This is hands down one of my favourite weekends every year.  I learned a bunch of things from fabulous tutors, met amazing artists, socialised with other lovely scrapbookers, and spent, well, lots.

It was such a joy to see my two kits for sale at the Daisy Chain Scrapbooks stand, and now that the Expo is all packed up and over for another year,  I can share the two layouts in full.

The first is "Love Your Way".


As I mentioned in this post, this layout features the My Minds Eye - Collectible - Memorable range, with lots of little blingy bits added.


As a little bonus, each kit came with instructions and supplies to make a card.  This is the card for the Love Your Way kit.


The second layout, featuring Echo Park Paper Co's Sweet Girl collection, is this cute girly page.


That little pink polka dot bow is just the most darling thing don't you think?  I pinned a tutorial and printable pattern from Jessica Jones over at How About Orange back in April, and knew I had to use that adorable bow somewhere.

I resized Jessica's template to 50% and simply cut the bow out in patterned paper and added it to my layout.


A close up of the layers and dimension.


And this is the bonus card that came with the Happy Little Moments kit.  I totally fell for the washing line patterned paper, those sweet little dresses hanging on the line are too cute!

Because there was a delay in some stock arriving in time for the expo, there are still a few kits available to purchase.  Contact the girls at Daisy Chain Scrapbooks if you're interested.

Throughout the weekend I managed to snap a few pics with some of the lovely ladies there.


I took classes with both Sonia Thomason and Angella Peardon.


With Barbi at the Daisy Chain Scrapbooks stand.


Meeting Natalie May from Adelaide.


And at the end of the weekend, this is the view back across the Brisbane River to Southbank by evening.  Big city, bright lights...love it.


Tuesday, 4 June 2013

An Exiting Weekend!

Hi Friends

This weekend is perhaps the biggest weekend of the year in the Scrapbooking Industry in Queensland. The Scrapbook & Papercraft Expo, held annually at the Brisbane Convention and Exhibition Centre, is right this very moment being assembled by hundreds of industry insiders with the latest in scrapping trends, gorgeous products and must have tools.  By the time Saturday arrives we can shop till we drop, and have many options of classes, tutorials and make 'n takes to be taught by talented artists from around Australia and across the world.

Am I thinking of going?  This may spark some debate if my husband hears I've said this, but I'd sooner go to the Scrapbook Expo than watch State of Origin live!  Yep, I'll be there for sure!

My absolute favourite Scrapbooking store, Daisy Chain Scrapbooks, is a longstanding exhibitor at the Expo and I can't wait to see their stand full of scrapping goodies.  Barbi and the girls have put together a beautiful selection of products for sale, and have three amazingly talented ladies teaching classes throughout the weekend.  Be sure to catch classes from Suzanne Tonga (scrapbooking) and Norma Newman and Janelle Evans (cardmaking) if you can.

I am super excited to share that I have designed two separate layouts that are available as kits for purchase from the Daisy Chain stand over the weekend.  The first is a layout using the bold pastels of the My Minds Eye - Collectible - Memorable range, and features some gorgeous bling.  Just a couple of sneak peaks today though.


This kit has a bunch of product in it.  Beautiful chipboard pieces, sparkly American Crafts thickers, lots of patterned papers, doilies, buttons, bakers twine and more.


Each kit contains all product you will need to complete the layout, with full instructions and colour photo to help you along the way.  As a bonus, each kit also has full instructions and a colour photo to make a gorgeous card with leftover product from the layout!


The second layout features the ever so cute Sweet Girl collection by Echo Park Paper Co, and will suit any girly photos.  I just love the lemons and pinks in this collection!

You will get to distress, ink, stitch, fussy cut, layer, pleat, even cut out a beautiful little bow from a template.  So much fun in one layout.

If you would like one of these kits for yourself they are available from the girls at the Daisy Chain Scrapbooks stand.  That's stand number 13, which is in the aisle closest to the classrooms.

So are you going to the Expo?  If you are I hope to see you there.  It's a fantastic opportunity to catch up with artists and designers that you wouldn't normally be able to, and enjoy the fun and friendliness of this fantastic hobby.  Be sure to stop by Stand 13 at Daisy Chain Scrapbooks, and say hi to the Daisy's girls.


Thursday, 30 May 2013

Mini Albums, Part Two

On my last post I shared the first two mini albums I made recently.  Today I'd like to share the final two albums that I created using the beautiful and ornate Twiddleybitz chipboard album base.


For my third mini album I chose the My Minds Eye - The Sweetest Thing - Bluebell range.  This range lent itself to a city chic styled theme for the little window setting on the front page, and the album theme in general.

You might notice that I cut away the vines and some of the window structure from the window overlay, to keep a clean and simple look.  I then backed the window firstly with cardstock and then layered in some doilies as lace curtains.

You might just be able to notice the gorgeous Maya Road vintage trinkets on the very left spine of the album.


For each quote included in this album, on the opposite page I would feature a prominent word from the quote.  After some layering, I used my Cricut to die cut the appropriate word from vellum, creating a gentle, pretty effect.


I think I managed to include at least one doily on every page of this album!


The quote to match the 'beautiful' page is from Mother Teresa 'Every time you smile at someone, it is an action of love, a gift to that person, a beautiful thing.'

I really enjoyed making this album, and the clean lines and simple structure are almost the polar opposite to the styling for the last album in the series, my "Abandoned Beach Shack" album.


I wanted to make my little beach shack pretty, rustic, wispy, flowery and shimmery.  I wanted it to feel like somewhere a mermaid would call home.  

There is no patterned paper used in this album at all.  The background is built up from layers of cardstock, flowers, gesso, ink, stitching, stamping, glimmer mist and glimmer glaze.


A tiny vial filled with sand and a pretty shell hang from the top binding ring, along with another Maya Road vintage trinket, and satin seam binding.

The shabby front window was altered by dampening the chipboard and distressing with a blade.  I was fairly heavy handed with the gesso, and added some Kindyglitz in the final layer for some sparkle.


Don't be afraid to cut down your chipboard pieces to use in smaller quantities.  I have used one large chipboard flourish and cut it into pieces so that I can use some on each page.


You can see the beautiful sheen left by the glimmer mist on this page.


Again, as in the previous album, I have pulled a single word from each quote to use as a feature.


There are so many shells glued into this album.  I needed to go back to the beach a few times to collect more!


This is probably my favourite album of the series.  I would have loved to keep it, but it was promised to a new owner.  I'll just have to make another like it for me!   


Thanks so much for sharing my mini album series with me!


Sunday, 26 May 2013

Mini Albums, Part One

So I have to admit, I'm not normally an 'off the page' kind of girl.  I like to have everything in its place.  To be able to file my layouts away in an album, in my bookcase.

But last year I saw this chipboard mini album made by Twiddleybitz and couldn't resist it.  Really, how cute are those shaped pages and ornate details!

Being my first off the page project, I was a little nervous about where to start.  I grabbed a 6 x 6" paper pad from the beautiful My Minds Eye - Follow Your Heart - Be Happy collection, some pretty lace and some Prima flowers and set to work.

You will often hear card makers mention how great 6 x 6" pads are for card making due to the smaller print on the patterned papers.  I think this is also true for mini albums, because you're working with a smaller workspace than the usual 12 x 12" layout.


Having said that though, I found some of the larger pages in the album were slightly wider than 6 inches.  Luckily the My Minds Eye paper pads have two pages of each design, so I simply used both pages of the one patterned paper, being careful to align the pattern on each edge.  If you look closely on my front page above, you will see the join above the banner.


Chipboard gives you so many options in terms of altering.  While the patterned paper covers most of the album pages, the edges of each chipboard page and the ornate details are begging to be altered.  On this album I used an off-white acrylic paint for most of those pieces, but a dark brown for the very front 'window', which I then distressed by sanding away some of the brown paint once dry, to give a shabby effect.


I inked and stitched around the edges of each page, and in some places you will see some additional stamping.

I made this album of my niece and nephew "Mud Puddle Jumping", in some puddles left by the previous night's rain.  You can't beat the joy kids get from simple pleasures huh?


You can see the beautiful detail in one of the ornate edges here.


The hexagon patterned paper was a little too bright for this page, so I simply gave it a light whitewash effect with some of my acrylic paint.  I used this same technique for the front page, over the music note paper.


The olive greens and sky blues in this collection are perfect for a boy page.


And there you have it, my first off the page project finished.  It wasn't so daunting after all!

Shortly after I finished this project, I was asked if I would make a series of three mini albums, to be given as gifts of appreciation to members of this wonderful organisation that provides much needed assistance to individuals and families across the Sunshine Coast, and other communities around Australia.

As these projects were gifts of appreciation to people I didn't know, it was impossible to include photographs in them.  In place of photos, I was provided with one inspirational poem to use, and then scoured Pinterest and the internet for other inspirational quotes.  Pinterest is an amazing source of information.  I have pinned so many wonderful quotes here, and it's great to have them on hand - you never know when you'll need a great quote!

Naturally because I loved working with this Twiddleybitz album so much the first time, I was excited to be given three more of these gorgeous albums to play with.


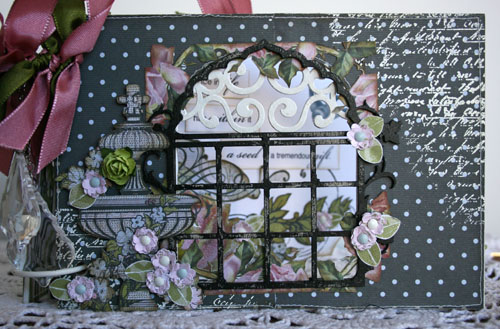
For this album, I had a French garden in mind.  I pulled papers from Kaisercraft's Lake House collection, which has a lot of floral elements to it, and really does have an air of a grand country garden.


Lots of opportunities for fussy cutting those gorgeous blooms.


This collection included a 3 x 4 journalling paper which provided a lovely quote for the album.


On some of the pages I printed the quotes on my printer directly onto cardstock, and then added them to a tag,  which could then be pulled out of a little hand made envelope.  


A close up of one of the envelopes.


So that's two slightly differing styles of decorating the same chipboard mini album.  I can't wait to show you the final two styles I came up with!