Wednesday, 16 July 2014

New Kit for Daisy Chain Scrapbooks

Okay you guys, I'm making an effort to get back to blogging more regularly, and hopefully I can make it part of my daily (well, at least weekly) routine.

I'm excited to share this layout with you today because it's a brand new kit I've designed for Daisy Chain Scrapbooks, and is in stock right now in store.


This kit features October Afternoon's Daily Flash | All Boy collection, which is an adorable boy-themed line.  Some of my favourite patterns in the collection are the woodgrain, anchors and moustaches - very, very cute.

These photos are of my cousin Amanda's little boy, Samuel, and are from a fun afternoon at Richmond in Tasmania last October.  You can't see it in these photos, but Samuel just had to bring Amanda's oversized old handbag with him and did an awesome job of carrying it around all afternoon.  We joked he was wrangling the man bag haha.


Because this is a kit layout I wanted to include some 'generic' journalling that would apply to pretty much any little boy's photos, so I chose a fun Dr Seuss quote and turned it into some hybrid journalling.  Part of the quote is printed on white cardstock, with the remaining words filled in with alphas, and then stitched over.


I've used the Epiphany Crafts Tool to make a personalised flair button from one of the patterned papers and layered with some punched, stamped and fussy cut shapes to form a cluster here.


Then I printed some hand lettering in black India Ink in a style to match the cartoon 'Zap!'  Once dry the word BAM! is fussy cut and clustered with one of those sweet moustaches and some alphas.


And the bonus card features my three favourite patterned papers as well.  A clean and simple masculine card (and what man wouldn't want to be awesome)!

Have you tried using quotes or lyrics as journalling on your layouts recently?  I'd love to hear which ones you've used.

If you'd like one of these kits complete with full instructions and everything you need to make the layout (sewing thread and regular consumables e.g. adhesives not included) get in touch with Barbi at Daisy Chain Scrapbooks and she can hook you up today.  Barbi is more than happy to mail any purchases to you.

Thanks for stopping by!


Friday, 11 July 2014

A Prima Kit Layout


Is anyone else finding their days filled to the brim lately?  Each week seems to fly by and before I know it another month has passed!  

Today I'm catching up on sharing a layout that was put together as a kit for Daisy Chain Scrapbooks at the Brisbane Scrapbook Expo (gasp!  how can that be a month ago already!).


I used Prima's Seashore collection with lots of lovely glittery flowers, some tea dyed muslin and lots of elements fussy cut from patterned paper.  This photo is one of my favourites of Kayci from our summer holidays, and I've trimmed it into three sections.


The clock face chipboard piece is from Scrapmatts, and I've simply given it a spritz with some Tattered Angels Glimmer Mist in Coffee Shop.


The title is made from a Manor House Creations Flexible Words pack, and I have layered a white piece over a black one to create a drop shadow effect.


The bonus card in this kit is a sea themed thank you card.


Unfortunately this kit is no longer available as it sold out at the show, but  I'm very happy to be working with the lovely Barbi at Daisy Chain Scrapbooks on some new kits, details coming very soon!

Thanks for stopping by!


Friday, 6 June 2014

A new Kit for Daisy Chain Scrapbooks

Hi friends, it's so nice to be back here on my blog after a break that has been longer than I expected.  I've still been working on lots of projects, just haven't had a chance to share them here.

This weekend is one of my favourite weekends of the year, the Brisbane Scrapbook and Papercraft Expo!  I'm looking forward to meeting up with scrappy friends, hopefully meeting some online friends in person for the first time, learning in the classrooms and definitely a bit of shopping too.

I have a few layouts that are being sold as kits at the Daisy Chain Scrapbooks stand.  This kit uses the lovely Teresa Collins Design | Memorabilia collection.


I so love chalkboard themed products and this collection features them heavily.  There is a lot of fussy cutting and a lot of stitching, both of which seem to have become a regular feature of any kits that I make.


I also love to make one-off DIY embellishments for my kits.  The feathers that feature on this layout are made from a template that comes with the kit, and they are then hand cut, sewn and then hand cut some more.  


The Studio Calico chevrons have had a little bit of a bling treatment ha!


I always, always include instructions and product for a bonus card to make after the layout in my kits.  I pretty much always do this myself when I make a layout and its a good way to use up all those little left over pieces.


There are three more of my kits that the Daisy Chain girls are stocking this weekend, so if you're at the Expo drop in and take a look.    This layout featuring Crate Paper's Boys Rule collection, a dreamy Prima Seashore layout, and also a bright and happy (and sparkly!) layout to document who you are right now using the Teresa Collins Design Daily Stories Collection are all bundled up and are ready and waiting on the shelves.

If you're at the expo and you recognise me from my profile pic or from my Instagram feed pull me aside and say hi - I'd love to meet you!

Happy weekend!!


Friday, 11 April 2014

A Super Quick & Easy Card

Hi friends, and Happy Friday!

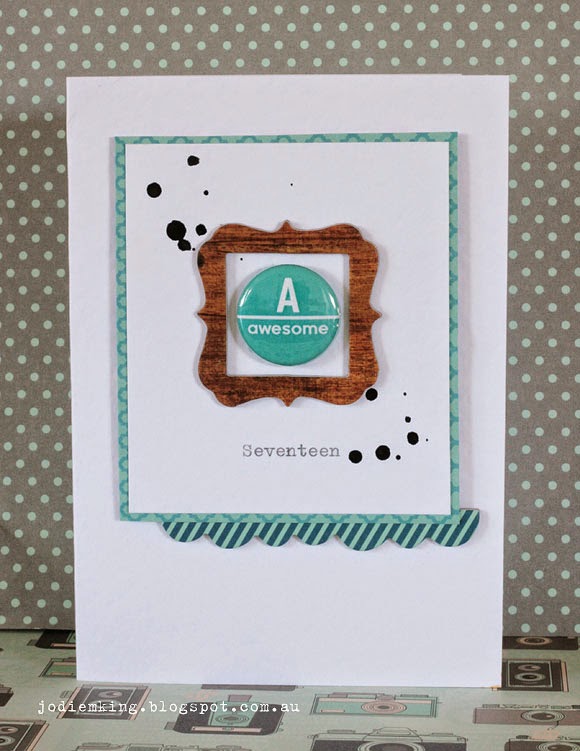
Sharing today a super quick and easy card that I put together for Brent's birthday recently.  Brent is pretty much a minimalist, clean lines and white on white is his kind of thing.


I had some new goodies on my desk from October Afternoon's Daily Flash collection - some Flash Chip - Frame Up chipboard, and a pack of Tin Pins.  

So with Brent's minimalist style in mind, I started with a white card base, layered patterned paper and some more white cardstock, a chipboard frame and border and a smattering of ink.  Topped off with the Awesome tin pin and this card was done and dusted in a matter of minutes.


I love that the tin pins fit so well inside all of the frames in this chipboard pack, and while I have them on my desk I'll be putting together a few more cards for my stash.

As I didn't have any papers from the Daily Flash collection, I pulled one of the patterned papers from the Travel Girl line (one of my favourite collections ever), and it matched perfectly.

Did you notice the ink I accidentally splodged on the frame?  I have to confess I may have cursed a little at that, but yes, I'll remember to cover my elements a bit better next time I'm throwing ink around ha!


It's Autumn here, my absolute favourite season, and the weather is delightful with blue skies and lots of sunshine.    We're planning a day out in the hinterland, walking trails and maybe even picnicking tomorrow and I'm so looking forward to it. 

Hoping you have a little something planned to enjoy your weekend ahead!


Friday, 28 March 2014

Project Life Guest Post for Scrapbook Creations Magazine Blog - Photographing the Unwilling

Today I have a guest post over at the Scrapbook Creations Magazine blog, sharing my 2014 Week 4 Project Life spread, and some of my go to methods for documenting the every day with teenagers, even when they might be unwilling photography subjects!


Hope you can drop by!


Wednesday, 26 March 2014

Boys Rule Feature on the Crate Paper Blog

Very excited to have my layout featured on the Crate Paper blog today!  The CP Girls came up with this challenge to celebrate their new Boys Rule collection.  This is such a fun filled boys themed line with lots of bright colours and retro graphics.

I've been working on a new kit for Daisy Chain Scrapbooks and it fit the challenge perfectly.  This is my layout, and the kit is coming soon to Daisy Chain.


I do tend to shy away from bright colours so this layout was a chance to push myself to go all out with colour.  I instantly fell in love with the Attaboy patterned paper and wanted it to be a major part of the layout.  So that it didn't overwhelm the embellishments I layered a sheet of vellum over the lower part of the paper to tone down the strong graphics.


How cute are the tiny alphas!?


My little nephew Josh scored this awesome superhero shirt from one of the Gold Coast theme parks while my sister and her family visited us over Christmas.  He loved it so much that he practically lived in it while they were here!  These photos of him in it are such a great match to this collection.


Let me know if you'd like to pre-order the kit at all, and I'll be sure to update my blog just as soon as they're in stock at Daisy Chain.

Thanks for stopping by!


Saturday, 8 March 2014

The Day She Turned 18

Sharing a layout today that was recently published in Scrapbooking Memories magazine.

This layout is one that's very close to my heart, and celebrates the day that my gorgeous daughter Kayci turned 18.


I've used the My Minds Eye - Find Your Wings & Fly - Sky's the Limit collection.  This collection really matched the sentiment of my layout - a message to my girl that the sky's the limit - she can achieve anything she wants to in this life.


I typed my journalling on a Dear Lizzy tag, tied it with some twine and slipped it in an envelope towards the top of the layout. I got a little bit excited with my metallics on this layout and went for both silver and gold! 


I fussy cut an extra hot air balloon from a Kaisercraft printed acetate sheet to layer over the two balloons on my background patterned paper.  I also fussy cut a few quatrefoil shapes
and applied some gesso with my fingertips to soften their colour.


Just love that this collection has so many little positive affirmations, from the brads right through to the tags.


And lastly a close up that shows some of the layers, my hand stitched border using embroidery thread, and the light application of watercolour to my background.

My Hot Tip included in the magazine was how to create an even hand stitched border.  To do this take the thread out of your sewing machine and set it to a long stitch - for me this is usually a length of 4.  Run your machine around where you want your border to be, then using your embroidery thread, backstitch your border in your colour of choice.

Thanks for dropping by!