Sunday 31 March 2019

Hip Kit Club | Sketch Challenge in a Traveller's Notebook!

Hi friends, today I have a traveller's notebook spread to share using the beautiful February 2019 Pocket Life kit and February 2019 Paper Kit from Hip Kit Club!


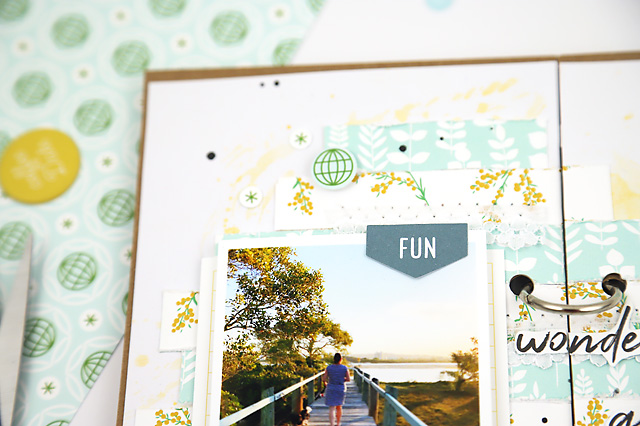
I'm playing along with this week's fabulous sketch by Anke, and I've pulled the mixed media background and layered horizontal strip elements from it, as well as the diagonal placement of embellishments.  Since I'm working in a traveller's notebook I shifted the photo to the left side of my spread rather than leaving it in the middle.


For my background I mixed a coordinating yellow watercolour and applied it using the packaging method.  While that dried I cut strips of two patterned papers to sit behind my photo and roughed them up with my edge distresser.


I pulled some lace from my stash and cut it into lengths to layer over some of the paper strips.  I stitched these on my sewing machine using a zigzag stitch and I love the extra texture and softness it gives the spread.
The Pinkfresh Studio Adventure paper has cute phrases in a scripty font on one side, and the other has globes and asterisks on it.  I fussy cut a couple of words for my title, and grabbed two small circle punches to punch out some globes and asterisks to scatter across the page as embellishment elements.

Finally I splattered a little black watercolour to help the title pop, and added some journalling to a fussy cut label.
Now it's your turn!  Jump on over to the Hip Kits Facebook group and join in this week's sketch challenge!  Did you know there's a $10.00 HKC gift certificate up for grabs each week!?  Just look for the weekly sketch challenge post by the lovely Tanya.
Thanks for stopping by today, and I hope I've given you some inspiration for a layered traveller's notebook spread!




Monday 25 March 2019

Fussy Cutting in a Traveler's Notebook | Hip Kit Club

Hi friends, I have a new traveler's notebook spread for Hip Kit Club today using the gorgeous February Project Life kit and February Paper kit, and I've pulled a lot of the super pretty papers from the Market Garden collection by Carta Bella in this one.

Since the patterned paper on the left side was powder pink and cream, I chose a cream cardstock to be the base of the right side.  

My assignment for this project is to include fussy cutting, and I'll admit I kinda went to town with it! I cut lots of florals to frame my photo on the right side.


Then I fussy cut some extra pieces from the cut apart paper for the left side of my spread.  The flower pots, small flower cluster at the top, and even the resting spot for the flower pots (repurposed from a bicycle cart shade) were all fussy cut.


Once I had a bunch of floral and leafy elements cut I layered them in a way that I liked around the top left and bottom right of my photo.  I added some messy gold thread in amongst my three flower clusters on the layout as well.

To finish the spread off I added a couple of the Pinkfresh Studio stickers and a brad from the Carta Bella pack in the Project Life kit.  


After I stamped the date stamp below my photo I called this one done.

How about you? Are you a fan of fussy cutting or not?  I was totally surprised when we had a group chat about this on the Hip Kit Facebook Members Group that about 90% of people loved fussy cutting, I mean, don't get me wrong I totally love it, but I know it's not for everyone.  I'd love to hear if you're team fussy cutting or not in the comments xo

Thanks so much for stopping by today,


Wednesday 20 March 2019

Project Life 2019! | Hip Kit Club

Hi friends!  

I've been so excited to get to share this project life spread with you!  This is the project that I created to submit with my design team application to Hip Kit Club, and it uses their beautiful January 2019 Project Life kit and Paper kit.

Since I applied for the DT, you already know that I love, love their kits, but seriously, how gorgeous are these project life cards!?


Here's a better looks at the full spread.  It was one of those Mondays that went a little bit pear-shaped, with me ending up in A&E for a few hours, but thankfully nothing serious was wrong with me and I eventually got to go home late that night.

I know it's good to record the bad along with the good in our PL albums, and I do, but I still choose to record it in a positive way.  For example my outlook on this hospital visit is that I'm thankful that I actually WASN'T having a heart attack, rather than the negatives of the experience. 


This 6x4 card made it so easy to add just a couple of small details to finish my title card for the week.


Of course I took a couple of photos of my hospital visit (what scrapbooker wouldn't!?) and let the photos tell their own story without any labels, but I did some detailed journaling on a 6x4 card below.


One of my go-to's with my project life spreads is to add a simple strip of patterned paper to the bottom of a journalling card.  It adds just a pop of extra colour.


I love how this spread turned out, and I so love that it led to me being invited to join the Hip Kit Club 2019 Design Team!

If you'd like to keep up with all things Hip Kit Club, here a few links to their website, blog and socials.  They have an amazing community page where subscribers, fans and designers share their projects, so be sure to check that one out:


Thanks for stopping by today, and I'm looking forward to sharing many more Hip Kit Club projects with you!


Wednesday 13 March 2019

A Traveler's Notebook Spread with Mixed Media & Stitching

I love using mixed media on traveler's notebook spreads, so I had a lot of fun putting this spread together for Mixed Media Monday on the Hip Kit  Club blog this week.  My assignment was to incorporate machine stitching, and I'm using the beautiful February Hip Kits that feature Pinkfresh Studio's Joyful Day collection,

My cousin has just had a gorgeous baby girl and I wanted to record one of her first photos with her birth details in a spread.  Isn't she the sweetest?!


After I prepared my cardstock base with clear gesso, my first step was to fussy cut some of the layered floral wreaths from the Pinkfresh Studio Big Ideas paper from the February paper add on kit.  

Once I was happy with the arrangement of them on my page I loosely sketched where they were going to sit.  I mixed purple, peach and green watercolours and, using my sketched circles as a guide, painted them in approximate circles extending past the inside and outside of each wreath, and let some of the colour run below where the wreath would sit on each one.  With the leftover watercolours I added some splatters.  I let that dry and watered down a little bit of gesso and splattered that across my page as well.


After that completely dried I picked coordinating colours from my stash of thick machine threads, and stitched messy circles around each wreath.  I love how it gives extra texture and another lay to my spread!


I added some puffy stickers and a couple of phrase stickers from the Project Life kit around the page, and some brief strip journalling printed from my computer, and with that called this spread done.


If you have a sewing machine sitting in the cupboard at home, I really encourage you to go ahead and pull it out and try some stitching on your layouts, it really does add unique and beautiful texture!

Thanks so much for stopping by today,


Monday 11 March 2019

Hip Kit Club | A Jar Full of Happiness Traveler's Notebook Layout

Hi friends!  Today I'm sharing my latest traveler's notebook spread for Hip Kit Club.  I'm using the beautiful February 2019 Project Life and February 2019 Add-On Paper kit, and since I adore mason jars I couldn't go past this Candy Hearts cut file that's filled with hearts and polka dots, and even has a ribbon and bow at the top!


I used the pink to red ombre paper from the Crate Paper La La Love collection to back the inside of the jar, and pulled out my trusty watercolour set to add some pink to the top layer of the cut file that I'd cut from white cardstock, and a turquoise to the ribbon and bow piece that sits at the top of the jar.  There really was no particular technique to apply the watercolour, I just used a small paint brush, dabbed here and then splattered there, and when it dried it turned out with a lovely mottled effect.

I backstitched in a matching turquoise embroidery thread on the outline of the jar and put all of the cut file pieces together.


A little journalling, some puffy stickers, chipboard pieces and a sweet flower paper clip from the Project Life kit and I called this one done.

If you haven't tried using a cut file in a traveler's notebook spread yet, I hope I've inspired you to give it a go - it's a lot of fun!

Thanks for stopping by today,


Tuesday 5 March 2019

Hip Kit Club | Traveler's Notebook Fun!

Hi friends!

I haven't popped in here in a hot minute, and I have some amazing news to share...


Yup!! That's little ol' me right there on the Twenty Nineteen Hip Kit Club design team!!

I can't even tell you how lucky I feel to be designing with these amazingly gorgeous kits, alongside such talented DT members and with the lovely Kimberly Hutchison and Kim Watson heading up the team.

And, without further ado, here is my very first DT project for the Hip Kit Club!


I've used the beautiful January Project Life and Paper Kits that feature Pinkfresh Studio Everyday Musings and Crate Paper La La Love collections, of course exclusive project life cards.

And I have to say at the very start, one of the things that I adore about Hip Kit Club is their choice of colour palettes each month.  They're fun and elegant at the same time, with lots of pretty pastels that suit my style absolutely perfectly.

On this TN spread I made the left side very symmetrical and added layers and visual movement to the right side.


 I fussy cut these little blue daisies and positioned them at the top of the page around the Maggie Holmes heart gem.


And then added a bow gem at the bottom of the journalling card, after printing my journalling out on it.

This phrase sticker was perfect for a spread about a fun family holiday.

To finish the layout I added some sequins from the kit and some watercolour splatters from my stash, and called it done.

Stay tuned for many more creations with the gorgeous Hip Kits.  You can find their website, blog and socials here, be sure to to check them out!


Thanks so much for stopping by today!